
Concrete & Masonry Steps: How to Choose the Right Style for Your South Jersey Home
Your front steps are the handshake of your home — they're the first thing visitors touch, the last thing they see when they leave, and the feature that takes the most daily abuse. Cracked, sinking, or outdated steps don't just look bad — they're a safety hazard and a liability. Here's how to choose the right steps for your home, what they cost, and why the details matter more than you'd think.
Types of Steps We Install
Not all steps are created equal. The right choice depends on your home's style, your budget, and how you want them to look 20 years from now.
Poured Concrete Steps
The workhorse option. Poured concrete steps are formed on-site, reinforced with rebar, and built as one solid monolithic structure.
Best for: Front entries, side entries, basement access, garage step-downs Lifespan: 30-50+ years Cost: $150 – $250 per step (standard 4-foot wide)
Advantages:
Strongest option — one continuous reinforced structure
Can be stamped and colored to match your patio or walkway
No individual pieces to shift or separate
Can be formed to any width or shape
Considerations:
Plain concrete steps look utilitarian without stamping or finishing
Difficult to modify after pouring — get the dimensions right the first time
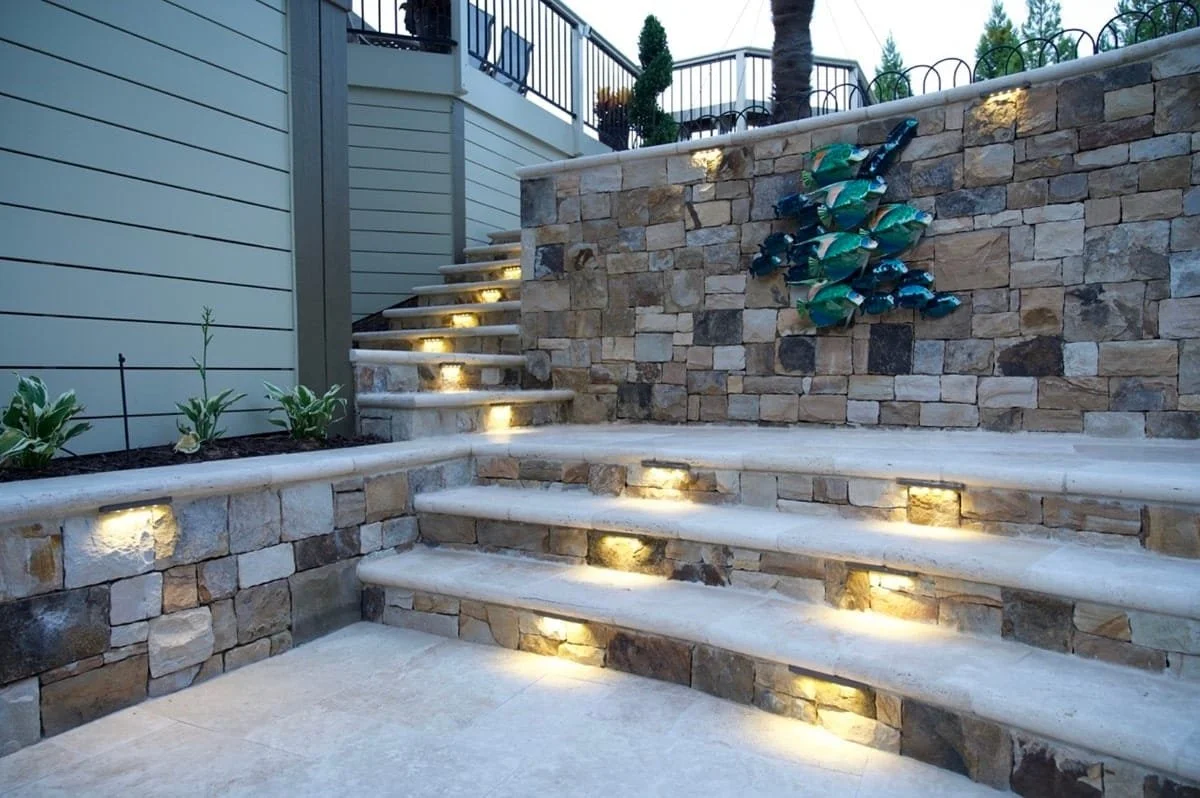
Stamped Concrete Steps
Poured concrete steps with decorative stamping, coloring, and a bullnose front edge. These are what we recommend for most homeowners who want their steps to look as good as their patio.
Best for: Front entries, patio step-downs, pool deck transitions Lifespan: 30+ years with resealing Cost: $200 – $400 per step
Advantages:
Matches your stamped patio or walkway perfectly
Bullnose edge is safer and more attractive than a sharp square corner
Color and pattern options are unlimited
Seamless transition from steps to landing to walkway
Design tip: Use a contrasting pattern on the step riser (vertical face) for a layered, high-end look. Our signature combination is a cobblestone riser with an Ashlar Slate tread and landing.
Block and Stone Veneer Steps
Concrete block core with natural stone, manufactured stone, or stucco veneer applied to the visible faces. This is the premium option for homeowners who want a true masonry look.
Best for: Grand front entries, outdoor kitchen surrounds, retaining wall step-ups Lifespan: 40+ years Cost: $350 – $600+ per step
Advantages:
Highest-end appearance — real stone texture and depth
Can match existing stone on your home's facade
Multiple material options (bluestone, brownstone, fieldstone, manufactured stone)
Built-in lighting can be incorporated into risers
Considerations:
Higher cost than poured or stamped
More complex installation
Veneer material choice affects long-term maintenance
Paver Steps
Individual paver units stacked and adhered to create step treads and risers. Often used when the adjacent walkway or patio is also pavers.
Best for: Matching existing paver patios, garden transitions Lifespan: 25-30 years Cost: $250 – $450 per step
Advantages:
Perfect material match with paver patios from Techo-Bloc, Belgard, or Cambridge
Wide variety of colors and textures
Individual damaged pavers can be replaced
Considerations:
Not as structurally monolithic as poured concrete
Adhesive between pavers can fail over time in freeze-thaw cycles
Requires a solid concrete or block core underneath
Anatomy of a Properly Built Step
Understanding what goes into a quality step helps you evaluate contractor bids:
The Foundation
Every step structure needs a proper footing — a thickened concrete pad below the frost line (36 inches in South Jersey) that prevents the steps from heaving or sinking. This is the part you never see, and it's the part bad contractors skip.
Red flag: If a contractor proposes building steps directly on top of soil or a gravel pad without a footing, walk away. Those steps will move within 2-3 winters.
The Core
The structural body of the steps. For poured concrete, this is the entire step. For veneered steps, it's typically concrete block (CMU) filled with concrete and rebar on top of the footing.
The Tread
The horizontal surface you step on. Standard tread depth is 11-12 inches — enough for your full foot. Each tread should have a slight forward pitch (1/8 inch) to shed water and prevent ice formation.
The Riser
The vertical face between treads. Standard riser height is 7-7.5 inches. Consistent riser height throughout the staircase is critical for safety — uneven risers are the leading cause of stair-related trips and falls.
The Landing
The platform at the top (and sometimes bottom) of the stairs. Building code typically requires a landing at least as deep as the door is wide. For front entries, we recommend a landing generous enough to stand comfortably while opening the door — at least 4x4 feet.
The Bullnose
The rounded front edge of each tread. A bullnose edge is safer (no sharp corners to trip on or chip), more comfortable underfoot, and looks significantly more finished than a square edge. We include bullnose edges on every step we build.
Common Step Problems in South Jersey
Sinking and Separation
The most common issue we see: steps pulling away from the home's foundation, creating a gap that widens over time. This happens when:
The footing wasn't deep enough (frost heave pushes the steps forward)
The soil underneath wasn't properly compacted
The steps weren't tied into the home's foundation with rebar or anchors
The fix: Usually requires demolition and complete replacement. Mudjacking or foam injection can sometimes re-level settled steps temporarily, but the underlying cause remains.
Surface Spalling
The top surface of the steps flakes and deteriorates, especially on the tread edges and nosing. Caused by:
Non-air-entrained concrete (freeze-thaw damage)
Deicing salt damage
Poor finishing during original construction
Age and UV exposure on unsealed concrete
The fix: Minor spalling can be repaired with a polymer overlay. Severe spalling requires replacement.
Cracking
Vertical cracks through the risers or horizontal cracks across the treads. Usually caused by:
Insufficient reinforcement (no rebar)
Settlement of the footing or soil
Impact damage
Thermal expansion without proper control joints
The fix: Structural cracks (wide, growing, or accompanied by movement) require replacement. Hairline cracks can often be sealed and monitored.
Rusted Railing Anchors
Metal railings anchored into concrete steps can rust over time, expanding and cracking the concrete around the anchor points. This is especially common on steps that are 20+ years old.
The fix: Remove the railing, chip out the damaged concrete around the anchors, patch with polymer-modified concrete, and re-install with stainless steel or galvanized anchors.
Railings: Code Requirements and Options
New Jersey building code requires railings on steps with 4 or more risers (roughly 30+ inches of elevation change). Even when not code-required, railings add safety and curb appeal.
Railing Options
Aluminum — Low maintenance, powder-coated in any color, clean modern look. Our most recommended option for most homes.
Wrought iron — Classic, elegant, perfect for traditional and historic homes. Requires periodic painting to prevent rust.
Vinyl — Maintenance-free, white or tan, affordable. Best for casual or colonial-style homes.
Cable rail — Modern, minimalist, unobstructed views. Popular on contemporary homes.
Stone or masonry columns with metal rail sections — Premium option. Stone columns flanking the steps with iron or aluminum rails between them. Makes a grand statement.
We coordinate railing installation with our step construction so the anchor points are cast into the concrete during the pour — not drilled in after the fact. This is stronger and prevents the cracking issues described above.
Step Replacement Process
Here's what a typical front step replacement looks like:
Day 1: Demolition
Remove existing steps, landing, and footing
Haul away debris
Excavate for new footing below frost line
Day 2: Foundation and Forming
Pour footing with rebar tied into home's foundation
Build forms for step structure
Install reinforcement (rebar grid)
Day 3: Pour and Finish
Pour concrete into forms
Apply color and stamping (if stamped steps)
Form bullnose edges
Detail and clean up
Days 4-7: Cure
Forms removed after 24-48 hours
Surface sealed after full cure (7-14 days depending on weather)
Railings installed after full cure
Total timeline: 3 working days plus cure time. Budget 2 weeks from start to full use.
What to Budget
Step Type Per Step Typical Front Entry (4-5 steps + landing) Plain concrete $150 – $250 $2,000 – $3,500 Stamped concrete $200 – $400 $3,000 – $5,500 Block with stone veneer $350 – $600 $5,000 – $9,000 Paver $250 – $450 $3,500 – $6,500
Add for railings: $800 – $2,500 depending on material and length.
Add for tear-out of existing steps: $500 – $1,500 depending on size and material.
Don't Ignore Your Steps
Crumbling, uneven steps are more than an eyesore — they're a fall waiting to happen and a liability if someone gets hurt on your property. If your steps are showing signs of failure, replacement isn't optional — it's overdue.
And if your steps are functional but ugly? A stamped concrete replacement that matches your patio transforms the entire look of your home for a few thousand dollars. It's one of the highest-impact, lowest-cost curb appeal upgrades you can make.
Get Your Free Estimate — We'll assess your existing steps and give you options.
Call: (856) 223-1100
Patrick Breen Masonry & Concrete — Mullica Hill, NJ — 43+ Years — NJ Lic #13VH00144300